Using Docker for local web development
- May 9, 2020
If you’re new to Docker, it’s hard figuring out even what to search for, and how the concepts tie together, let alone what to pay attention to for your use case.
To make things more difficult, there has been a lot of change over time, and stuff that was once recommended is now not recommended. For example, a lot of older video tutorials recommend using container links which have since been deprecated in favor of user-defined bridge networks .. in case you’re unfamiliar with this, I’ll cover what this means, and why you’d use it later in the blog post.
Once you learn the basics, using Docker in practice is fairly straightforward, and if you’re using Docker at home or at work, the time you spend learning now will save you a massive amount of time and effort in the future.
If you’ve used Docker a bit, are familiar with some of the concepts, how dabbled here and there, but sometimes struggle with connecting some of the concepts, or how to get things set up end-to-end, then this blog post is for you.
In this blog post, I’ll guide you through step by step on:
- The distinction between docker image and containers
- Best practices on how to persist data within containers, and how to control where data is persisted
- How to continue developing on your local machine as usual, while your app is running within a docker container on your local machine
- How to connect your containerised web app to a containerised Microsoft SQL Server
Getting set up
I’ll be using Git Bash on Windows for running commands in the Cmder shell. If you don’t already have it, the easiest way is to download Cmder which is bundled with git bash. If you want to use cmder, make sure you click on the “Download Full” button.
This blog post will be easiest to follow if you use Git Bash too, but feel free to use whatever command shell you want.
I’ll also be using Docker Desktop which supports Docker for Windows and Docker for Mac. If you don’t have it already, grab it here: https://www.docker.com/products/docker-desktop
The examples will be using .NET Core 3.1, which you can grab here: https://dotnet.microsoft.com/download/dotnet-core/3.1
What are some of the characteristics of a container?
- Isolated - each container has its own set of dependencies not shared with other containers, and is also unaffected at runtime by other containers / processes
- Consistent - each time you start a container, it’s using the exact same image each time, so you don’t end up with different behavior depending on what’s installed on the host machine
- Portable - because dependencies are packaged along with the application, it’s easy to install across multiple hosts, whether that’s your local development machine, or production
- Easy to use - it’s easy to start, stop, set up, and delete a container. You’ll see this shortly in the blog post below.
- No installation for local development, other than Docker Desktop, there is no installation required
Docker Images vs Containers
A Docker image is built up from a series of layers where each layer of the image represents an instruction in a Dockerfile.
Consider the following Dockerfile which contains four instructions, each forming a layer in the Docker image, with the final layer specifying what command to run within the container:
FROM ubuntu:15.04
COPY . /app
RUN make /app
CMD python /app/app.py
In this case, we:
- Use Ubuntu 15.04 as our base image
- Copy the contents of the current directory, in this case, the app source code, to the /app folder within in the image
- Run
make /appwithin the image - Run
python /app/app.pyon container startup
Here’s an diagram of what the image and resulting container might look like, note that we’ve got four read-only image layers each representing a command in the Dockerfile, and a final layer called the ‘Container Layer’, which is a thin read-write layer on top of our image:
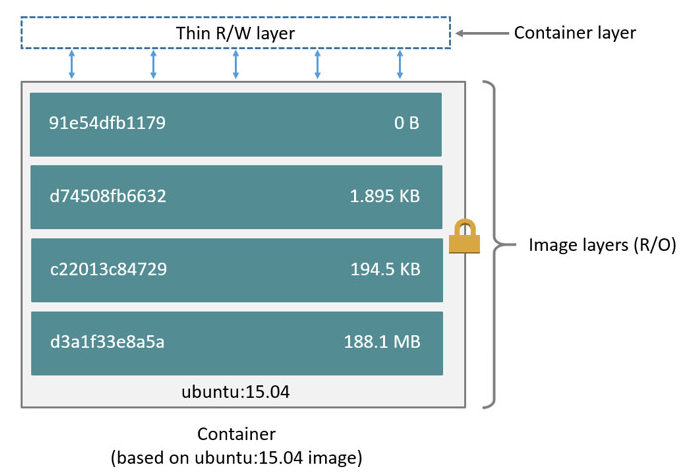
The container layer contains a thin read/write layer which enables us to support persistence within the container, for example writing log files, or if you want to run a database within the container, this read/write layer will enable you to create the database, along with reading and writing database records.
While you can store data within the container’s read/write layer, it’s actually best practice to use docker volumes for persistence rather than the container’s read/write layer. We’ll get into that later in the blog post.
How to see the instructions that were used to build a Docker image
If you’re interested in seeing the list of instructions that built up a given image, you can use the docker history command. Since we’ll be using the .NET Core SDK image later in the blog post, we may as well look at that. First, pull the image for .NET Core SDK 3.1:
docker pull mcr.microsoft.com/dotnet/core/sdk:3.1Then run the command to see the image history:
docker history mcr.microsoft.com/dotnet/core/sdk:3.1In some images, you’ll see <missing> hashes. You can read more about why here: Why are Docker layer IDs missing?
When you run the command, you’ll see a list of the layers in the image, as well as the command that was executed to generate the layer. For example:
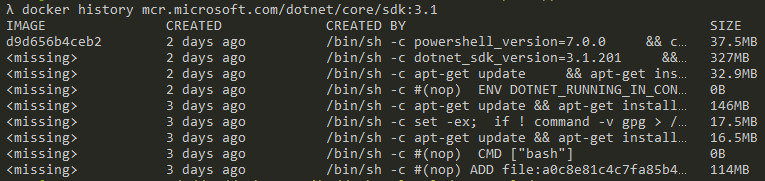
One way to think about the distinction between a container and an image is that an image is a set of read-only layers which build on one another, whereas the container runs the image and has a thin read-write layer that can be written to by whatever code / apps are running within the container. The read/write layer exists as long as the container exists, and gets deleted once the container is deleted. Later, I’ll show you how data can be persisted for longer with Docker volumes.
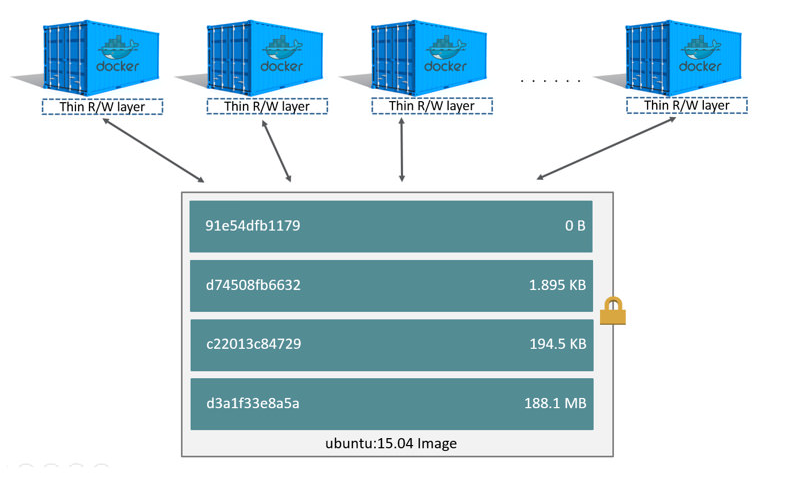
One of the things that makes Docker quite efficient is that while containers each have their own read/write layer, containers share image layers. For example if you were to build multiple containers on the Ubuntu 15.4 image, the image would be shared across all of the containers. You can see this illustrated in the diagram below:
You can read more in the official Docker documentation: Docker - About Storage Drivers
Persisting data for longer than the lifetime of the container
When a container is deleted, the container’s thin read/write layer is also deleted, but what if you want to persist data for longer, or if you have data that you don’t want to store in the container? For this, we can use Docker Volumes.
Docker volumes can be shared and re-used among containers. The fact that docker volumes don’t get deleted when the container is deleted or when the image is updated, is one of the things that makes volumes useful for any data that you want to stick around for longer than the lifetime of the container.
You can think of a docker volume as a folder on your docker host that gets mounted as a folder within the docker container.
What’s a docker host? If you’re developing locally, the Docker host can be thought of as your local dev machine. It is the Docker host that runs Docker Desktop, and hosts any running docker containers.
As a concrete example of using a docker volume, you could mount a local folder on your Docker host such as /c/dev/my-app/logfiles to /var/log/my-app within the container. This means that rather than having your container write to it’s read/write layer at this particular path, it can actually write to the folder you mounted on the docker host. This is actually the preferred way of persisting data that is generated within a docker container. From the official docs:
Avoid storing application data in your container’s writable layer using storage drivers. This increases the size of your container and is less efficient from an I/O perspective than using volumes or bind mounts.
You can read more in the official Docker documentation: Docker - Data Volumes
How to get source code into containers using Docker Volumes
What if you want to run your development environment within a docker container, while still using your favorite editor to edit code as you usually would, and not have to rebuild the container every time you make changes to the code? You can do this with docker volumes.
With docker volumes, you can work with your source code on your Mac/Windows/Linux machine as usual in your favorite editor or IDE, and have your container read from your source folder using docker volumes. I’ll show you how.
In the command line, create a new project folder, i.e. /c/dev/docker-local-dev-sample.. for the rest of the blog post, i’ll refer to this folder as your project folder.
From within your project folder, execute dotnet new mvc -n app --no-https to create a sample MVC app. Take a look in the folder and you should see something like the following:
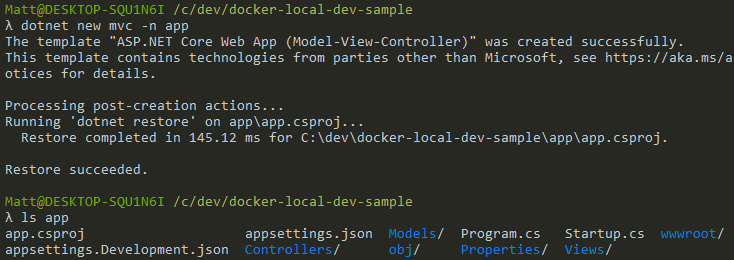
Start the app up now if you like and test that it runs on it’s default port http://localhost:5000 …
dotnet restore app && dotnet watch --project app runIf you didn’t grab it earlier, we’ll now need to grab the .NET Core SDK image from DockerHub which will allow us to build our app within the container. DockerHub conveniently gives us the command to run near the top right of the screen:
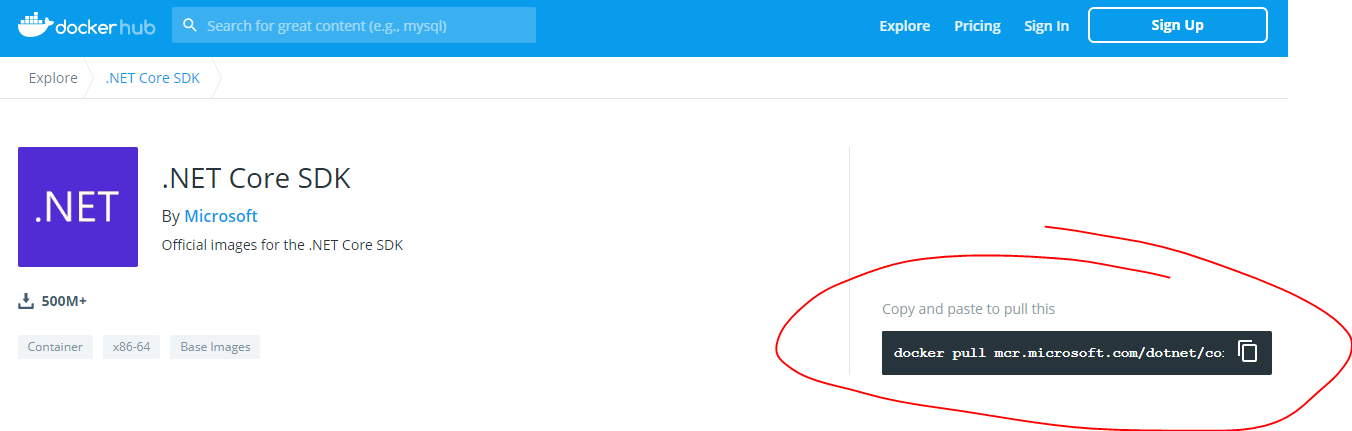
Run the docker pull command to grab the image for .NET Core 3.1:
docker pull mcr.microsoft.com/dotnet/core/sdk:3.1I’d pulled the image earlier, so already cached and up to date with the image on DockerHub. Here’s what the output of that command looked like for me:

In the next couple of steps, we’ll start up the container. If you’re running Git Bash for windows, you’ll first need to set an environment variable so $(pwd) will work correctly when we’re running docker run:
export MSYS_NO_PATHCONV=1;From within your project folder, start the container using the image with the following command:
docker run -it --name my-app -v $(pwd)/app:/app -p 8080:80 -w /app mcr.microsoft.com/dotnet/core/sdk:3.1 bashThere are a couple of errors that you could potentially receive when running this command. If you run into an error, scroll down a bit to the sections labeled “Potential error”.
-itruns Docker in interactive mode--name my-appgives the container a name of “my-app”; if you don’t specify a container name, it will be assigned a random one-v $(pwd):/appmounts a volume, in this case it mounts the current directory on the host machine via$(pwd)to/appwithin the docker container-p 8080:80maps port 8080 on the host machine to port 80 within the container-w /appsets/appas the working directory within the containermcr.microsoft.com/dotnet/core/sdk:3.1is the image that we want to run in the container- Finally,
bashis the command to run in interactive mode, so that we receive a bash command prompt once we enter the container
If all goes well, you should see a command prompt which looks like the screenshot below. Note how our source code files from /c/dev/my-app are in the /app folder of the container, which we mounted as a volume earlier:

“docker run” potential error: The working directory is invalid
If you’re using Git Bash in Windows, you may see an error like:
docker.exe: Error response from daemon: the working directory 'c:/dev/docker-local-dev-sample' is invalid, it needs to be an absolute path.In that case, you need to run the following command to set up the MSYS_NO_PATHCONV variable:
export MSYS_NO_PATHCONV=1;Then execute the docker run command again.
“docker run” potential error: The container name “/my-app” is already in use
If you try to run the docker run command multiple times, you may get an error that looks like the following:
Error response from daemon: Conflict. The container name "/my-app" is already in use by container "79e9c". You have to remove (or rename) that container to be able to reuse that name.First you need to stop the container:
docker stop my-appThen remove the container and it’s read/write layer:
docker rm -v my-appThen execute the docker run command again.
Starting the .NET Core web app within the container
Now that we’re able to run the my-app container and get a command prompt within the container, we can try starting the web app.
Make sure you’re at a command prompt within the container for example:
We’ll need to set a couple of environment variables within the container.
Docker containers don’t play nicely with urls containing localhost such as the ones in Properties/launchSettings.json, and we want our web app to run on port 80. This can be done using the ASPNETCORE_URLS environment variable:
export ASPNETCORE_URLS=http://+:80We can use DOTNET_USE_POLLING_FILE_WATCHER because Docker containers may not reliably send change notifications which dotnet run watch depends on.
DOTNET_USE_POLLING_FILE_WATCHER polls the filesystem every four seconds for changes, enabling us to modify our source files locally, and have .NET Core automatically reload them:
export DOTNET_USE_POLLING_FILE_WATCHER=1Start up the app with:
dotnet restore && dotnet run --no-launch-profileWe’re using --no-launch-profile because otherwise dotnet run watch would use Properties/launchSettings.json to determine the URLs that are used.
Ordinarily when building a container image, we’d use a .dockerignore file to ignore files such as launchSettings.json, however docker volumes cause the host directory to be mounted into a container’s filesystem as-is, with no ability to copy files into the container or ability ignore to certain files.
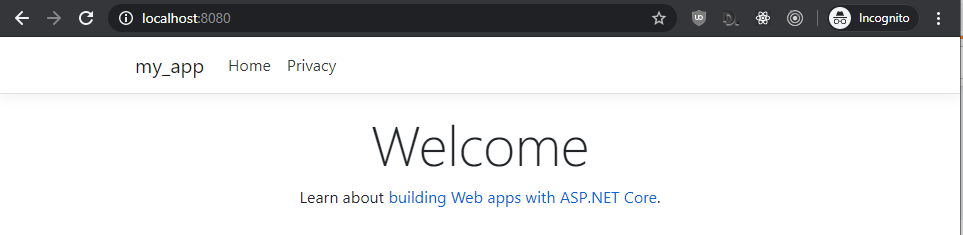
The web app should now be accessible from your docker host on http://localhost:8080 so try visiting it now, and you should see something like this:
Why use Docker Compose?
The command line is useful, however for most development environments, you’ll likely be starting up multiple containers and simulating production.
You may have an NGINX reverse proxy container that points to an ASP.NET core web app running within a container, which reads and writes to a Microsoft SQL Server database which also runs in a container. Orchestrating all this via the command line to configure and manage those containers can easily become unwieldy. This is where Docker Compose comes in handy.
Docker Compose enables you to define your entire development environment within a single file The octopus in the official logo above gives a good illustration of this.
From the official docs for docker compose:
Compose is a tool for defining and running multi-container Docker applications. With Compose, you use a YAML file to configure your application’s services. Then, with a single command, you create and start all the services from your configuration.
Docker Compose gives you a straightforward way to:
- Start, stop, and rebuild services
- View the status of running services
- Stream the log output of running services - you don’t have to run a command per container
- Run a one-off command on a service
Docker compose allows you to have multiple images, convert those images into containers,
You can read more about Docker Compose in the official docs: https://docs.docker.com/compose/
Starting a container using Docker Compose
Here’s an example of a docker-compose.yml file for the .NET Core app we created earlier:
version: "3.7"
services:
  app:
    image: mcr.microsoft.com/dotnet/core/sdk:3.1
    container_name: my-app
    environment:
        - ASPNETCORE_URLS=http://+:80
        - DOTNET_USE_POLLING_FILE_WATCHER=1
    volumes:
        - ./app:/app
    ports:
        - 8080:80
    working_dir: /app
    command: bash -c "dotnet restore && dotnet watch run --no-launch-profile"
Copy+paste the above text into a new file named docker-compose.yml in your project folder, then execute:
docker-compose upBut what does each of those lines in the docker-compose file actually do? From the top:
version: "3.7"specifies which version of the docker compose file format to use. At the time of writing this, the latest version is 3.7.
- The items under
services:are called service definitions, and each can have an arbitrary name, so give it whatever name makes the most sense for you. In this case,app:is the name of the service definition for our ASP.NET Core web app. - The Docker image is specified by
image: mcr.microsoft.com/dotnet/core/sdk:3.1, in this case, since we’re getting setup for local development, we’re using the .NET Core SDK 3.1 image, which will let us build .NET core apps. If you were running pre-built apps or running in production you’d use the ASP.NET Core Runtime image - The container name is specified by
container_name: my-app, this gives you a predictable name when you rundocker psto see what containers are running. - Environment variables are listed under
environment: - Docker volumes are specified under
volumes:, in this case, we’re mounting the current folder to/appin the docker container. ports:sets it up so that port 8080 on the docker host, points to port 80 within the container, which is the port hosting our app.working_dir:sets the container’s working directory- Finally,
command: bash -c "dotnet restore && dotnet watch run --no-launch-profile"is the command to execute once the container starts up. It’ll be executed in the working directory configured above.
You can read more about the compose file format here: https://docs.docker.com/compose/compose-file/
Now edit your source code on your local machine as usual
Now that you’ve started your container with Docker Compose, on your Docker host, visit http://localhost:8080 in the browser, and you should see something like this:
While the app is running, try modifying some of the source code. For example, open up your preferred editor, and change the title from ‘Welcome’ to ‘Welcome to my-app’ in Views/Home/Index.cshtml.
After making the change, wait a few seconds for .NET Core to detect the change and rebuild the app, then refresh the page. You should see the following:
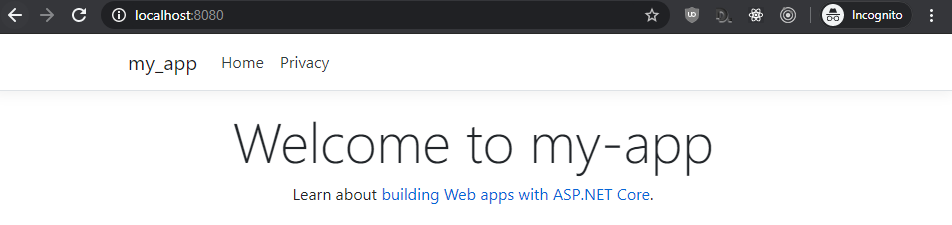
What we’ve got here is our app building and running within a Docker container on port 80, our app exposed to our docker host on port 8080, with the ability to keep editing code locally as usual.
How to enter a running container and get a command prompt a.k.a. interactive mode
What if you want to run some commands manually within a container?
Once the container has started up, you can then enter the container, using docker exec:
docker exec -it my-app bashWhere my-app is the name of the container, and bash is the command to run within the container, giving us a bash prompt that is running within the container:

Now that you have a command prompt within the container, try running a command such as top to see the active processes.
Adding a SQL Server Database
We’ve set up a docker-compose file with a single service running ASP.NET core, but that isn’t very useful without it being able to fetch some data of some kind.
In these next few steps, I’ll show you how to update the docker-compose file to add a Microsoft SQL Server database running in a Linux container, preloaded with the AdventureWorks database.
I’ll then show you how to connect to the database from the docker host, from within the .NET Core container, and later, from the ASP.NET web app which is running within the container.
Update your docker-compose file to add a service definition called db:
version: "3.7"
services:
  app:
    image: mcr.microsoft.com/dotnet/core/sdk:3.1
    container_name: my-app
    environment:
        - ASPNETCORE_ENVIRONMENT=Development
        - ASPNETCORE_URLS=http://+:80
        - DOTNET_USE_POLLING_FILE_WATCHER=1
    volumes:
        - ./app:/app
    ports:
        - 8080:80
    working_dir: /app
    command: bash -c "dotnet restore && dotnet watch run --no-launch-profile"
    depends_on:
      - db
  db:
    container_name: my-db
    image: robyvandamme/mssql-server-linux-adventureworks
    environment:
        SA_PASSWORD: "password-1234"
        ACCEPT_EULA: "Y"
    ports:
        - 1433:1433
This configuration is similar to the app service definition, with a couple of changes that are SQL Server specific:
SA_PASSWORD: "password-1234"sets a default password for local development. Because the password is visible, this isn’t appropriate for production.ACCEPT_EULA: "Y"accepts the end user license agreement and is required in order to use the MS SQL- Port
1433is the standard MS SQL port
More info here: https://docs.microsoft.com/en-us/sql/linux/sql-server-linux-configure-docker
How to connect to the containerised Microsoft SQL Server from your docker host
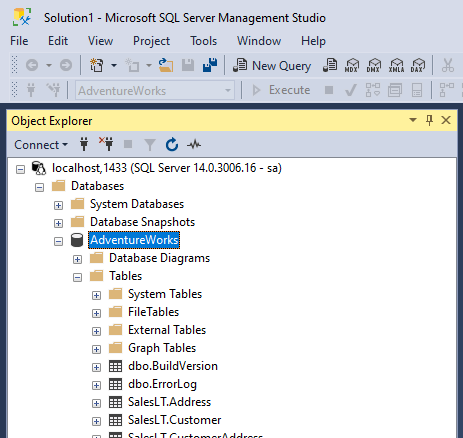
Because we’ve exposed port 1433 to the docker host in docker-compose.yml, we can connect from the docker host to the SQL Server that is running within the container. I’m using SQL Server Management Studio, but you can use whatever SQL client you like.
Use SQL Server’s admin username sa and password: password-1234:
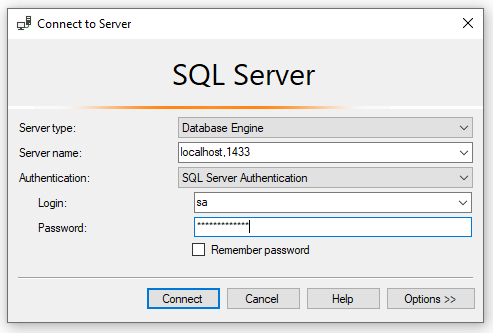
And you should see the AdventureWorks database which comes bundled with the robyvandamme/mssql-server-linux-adventureworks docker image.
Now that you’re connected, you can do all of the regular queries, inserts, deletes, etc, that you would usually do on SQL server. In this case, changes would be persisted to the container’s read/write layer, so remember that if you delete the container, the changes would also get deleted.
Connect your ASP.NET Core app to the MS SQL DB
In this part we’ll connect to the database, run Entity Framework Scaffolding to generate C# classes for our database models, and run a simple query against the database to fetch some data.
From the official Docker compose docs:
By default Compose sets up a single network for your app. Each container for a service joins the default network and is both reachable by other containers on that network, and discoverable by them at a hostname identical to the container name.
This means that the SQL Database will be accessible within the container hosting your app service with hostname db (the name we gave our service), and port 1433 (the port that Microsoft SQL Server is running on)
Let’s start with scaffolding out the C# data models for the existing Adventureworks database using Entity Framework scaffolding.
Install the command-line interface (CLI) tools for Entity Framework Core:
dotnet tool install --global dotnet-efAnd in order to use Entity Framework in the project, you’ll also need to install a couple of NuGet packages. Run the following two commands from within the app folder:
dotnet add package Microsoft.EntityFrameworkCore.Design
dotnet add package Microsoft.EntityFrameworkCore.SqlServer
Run the EF scaffold command:
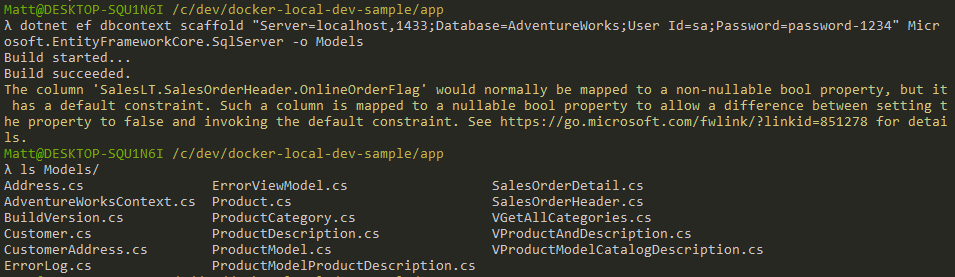
dotnet ef dbcontext scaffold "Server=localhost,1433;Database=AdventureWorks;User Id=sa;Password=password-1234" Microsoft.EntityFrameworkCore.SqlServer -o ModelsEF scaffolding needs to connect to the SQL database, so make sure the container is running (via docker-compose up), otherwise you’ll see an error that looks something like this:
A network-related or instance-specific error occurred while establishing a connection to SQL Server. The server was not found or was not accessible. Verify that the instance name is correct and that SQL Server is configured to allow remote connections. (provider: TCP Provider, error: 0 - No connection could be made because the target machine actively refused it.)If all goes well, you should see output like the following, as well as a bunch of C# classes in the Models folder which reflect the database tables in the AdventureWorks database:
Update docker-compose.yml to add a new environment variable to the app service:
ASPNETCORE_ConnectionStrings__DefaultConnection=Server=db,1433;Database=AdventureWorks;User Id=sa;Password=password-1234So that it looks like:

In Startup.cs, register AdventureWorksContext:
services.AddDbContext<AdventureWorksContext>(options =>
    options.UseSqlServer(Configuration.GetConnectionString("DefaultConnection"))
);
Your tooling should prompt you to add a couple of using statements in Startup.cs, but if not, here are the ones to add:
using Microsoft.EntityFrameworkCore;
using app.Models;
Finally, add a new Controller, Controllers/AddressController.cs:
using System.Diagnostics;
using System.Linq;
using Microsoft.AspNetCore.Mvc;
using Microsoft.Extensions.Logging;
using app.Models;

namespace app.Controllers
{
    public class AddressController : Controller
    {
        private readonly AdventureWorksContext _context;

        public AddressController(AdventureWorksContext context)
        {
            _context = context;
        }

        public IActionResult GetFirstAddress()
        {
            return Ok(_context.Address.FirstOrDefault());
        }
    }
}
To ensure that .NET Core reloads all the new configuration, exit docker-compose, and start everything up again via:
docker-compose upIt can take a while for both the app and DB to start up, so wait until you see that ASP.NET web app is listening on port 80 in the console:
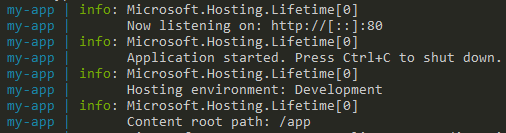
Navigate to http://localhost:8080/address/getfirstaddress and you should see something like:

In this section, we finished our setup of an end-to-end test of accessing ASP.NET Core MVC running within a docker container, communicating with a Microsoft SQL database running in a different container.
And we’re done
In this article, we covered a lot of the fundamentals on getting docker set up for local web development. By now, you’ve learned about:
- Some of the characteristics of a container (isolated, consistent, portable, easy to use, no installation)
- The difference between a docker image and a container
- How to see what instructions were used in the Dockerfile which built a container
- How to enter a running container, and get a bash prompt
- Run an ASP.NET web app within a docker container, and how to expose a port so that you can access it from your docker host
- Using docker volumes to enable you to continue developing on your local machine as usual, while your app is running within a docker container on your local machine
- Connecting an ASP.NET web app running in a container to Microsoft SQL Server running in a different container
A lot was covered, but this should give you a pretty good foundation of some of the concepts and common questions asked when running docker on your local machine.
Want to read more?
Docker for Web Developers (pluralsight.com) - a great introductory course which covers many of the concepts in this blog post
Docker development best practices (docker.com)
Dockerfile Best practices (docker.com)
Thanks for reading!
Enjoyed this article? Follow me on Twitter
Any questions, feedback, or anything that you think I’d be interested in? Please leave a comment below, or get in touch with me directly.