Google Authentication with Python and Flask
- Apr 23, 2019

In this blog post, you will learn how to create a Python app using Flask and the Google API which will:
- Support Google Authentication with Python and Flask
- Restrict access via an OAuth scope, so that the app can only view and manage Google Drive files and folders which were created by the app
- Read and write files on the user’s Google Drive with Python.
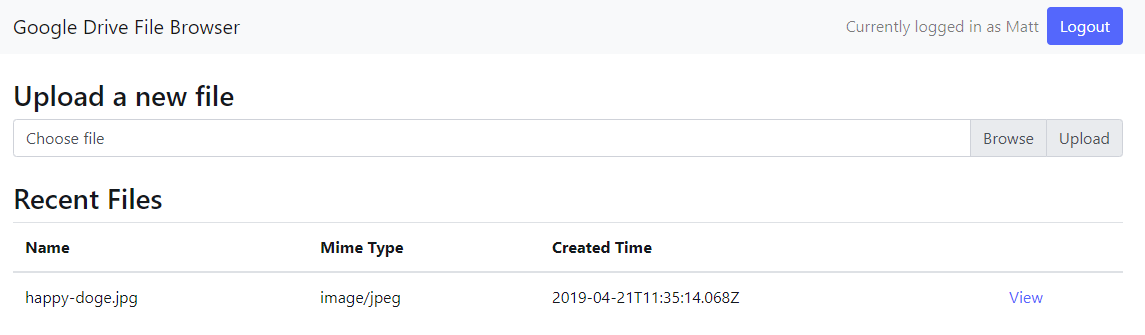
By the time you get to the end of this blog post, you’ll have built a basic Google Drive file browser which looks something like:
This blog post is divided up into sections which progressively build up an app which interacts with the user’s Google Drive. If you only want to find out about how to do user Authentication with Google and Python, feel free to stop there.
The Google API docs are confusing!
Getting Google authentication and authorization set up was quite a confusing process; there are lots of scattered, confusing, obsolete, or generally misleading docs on how to integrate Python with Google Drive. For example:
- The Google Drive V3 Python Quickstart had an example which uses oauth2client. After spending a fair amount of time trying to get it working, I was surprised to find that oauth2client is deprecated, and not recommended for use.
Disclaimer
Security is a big topic, and the advice this blog post doesn’t come with any warranty or guarantees.
Prerequisites
Make sure you have the following before you start:
- A Google account
- The Anaconda distribution of Python
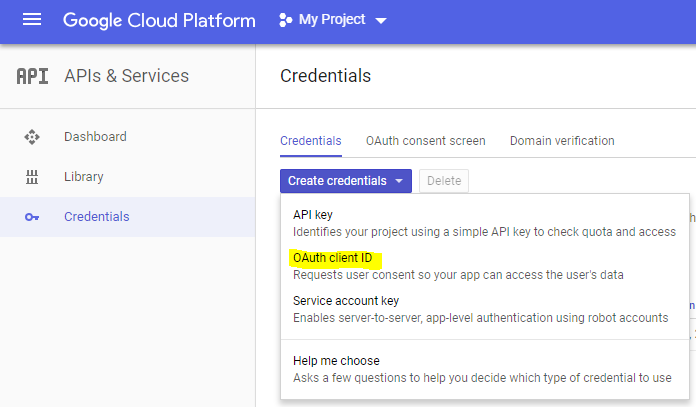
Set up a new Google OAuth client ID
Navigate to the Google API console and select the option to create a new set of OAuth credentials:
Then set up the OAuth redirect URI. For this app, we’ll be running on localhost, port 8040, and redirecting to /google/auth, so our redirect URI will be http://localhost:8040/google/auth.
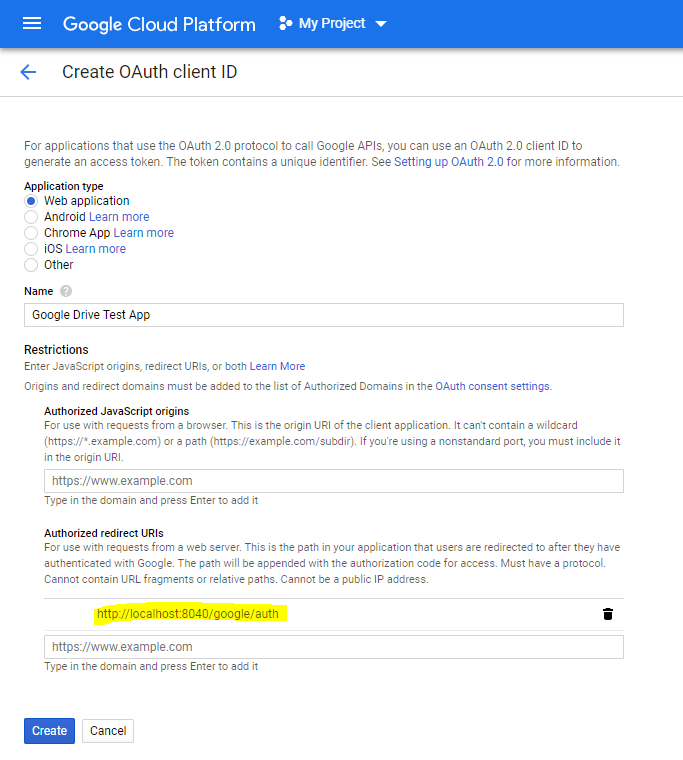
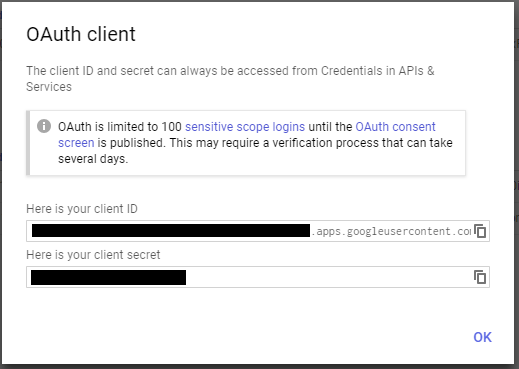
Once you’re done, click Create, and you’ll be presented with a dialog with our OAuth Client ID and Client Secret. Copy these, and store them somewhere safe. We’ll use them later.
Google Authentication with Python and Flask
We’ll be using Authlib as an alternative to the deprecated oauth2client. For this example, there’s no special reason to use Authlib instead of google-auth; the only reason I used Authlib is because I found the Authlib documentation easier to follow than google-auth.
Add a file with requirements.txt with the following:
authlib==0.11
flask==1.0.2
google-api-python-client
google-auth
virtualenv
Install the packages in requirements.txt via the following command:
pip install -r requirements.txtCreate a file called google_auth.py containing the following:
import functools
import os

import flask

from authlib.client import OAuth2Session
import google.oauth2.credentials
import googleapiclient.discovery

ACCESS_TOKEN_URI = 'https://www.googleapis.com/oauth2/v4/token'
AUTHORIZATION_URL = 'https://accounts.google.com/o/oauth2/v2/auth?access_type=offline&prompt=consent'

AUTHORIZATION_SCOPE ='openid email profile'

AUTH_REDIRECT_URI = os.environ.get("FN_AUTH_REDIRECT_URI", default=False)
BASE_URI = os.environ.get("FN_BASE_URI", default=False)
CLIENT_ID = os.environ.get("FN_CLIENT_ID", default=False)
CLIENT_SECRET = os.environ.get("FN_CLIENT_SECRET", default=False)

AUTH_TOKEN_KEY = 'auth_token'
AUTH_STATE_KEY = 'auth_state'

app = flask.Blueprint('google_auth', __name__)

def is_logged_in():
    return True if AUTH_TOKEN_KEY in flask.session else False

def build_credentials():
    if not is_logged_in():
        raise Exception('User must be logged in')

    oauth2_tokens = flask.session[AUTH_TOKEN_KEY]

    return google.oauth2.credentials.Credentials(
                oauth2_tokens['access_token'],
                refresh_token=oauth2_tokens['refresh_token'],
                client_id=CLIENT_ID,
                client_secret=CLIENT_SECRET,
                token_uri=ACCESS_TOKEN_URI)

def get_user_info():
    credentials = build_credentials()

    oauth2_client = googleapiclient.discovery.build(
                        'oauth2', 'v2',
                        credentials=credentials)

    return oauth2_client.userinfo().get().execute()

def no_cache(view):
    @functools.wraps(view)
    def no_cache_impl(*args, **kwargs):
        response = flask.make_response(view(*args, **kwargs))
        response.headers['Cache-Control'] = 'no-store, no-cache, must-revalidate, max-age=0'
        response.headers['Pragma'] = 'no-cache'
        response.headers['Expires'] = '-1'
        return response

    return functools.update_wrapper(no_cache_impl, view)

@app.route('/google/login')
@no_cache
def login():
    session = OAuth2Session(CLIENT_ID, CLIENT_SECRET,
                            scope=AUTHORIZATION_SCOPE,
                            redirect_uri=AUTH_REDIRECT_URI)

    uri, state = session.authorization_url(AUTHORIZATION_URL)

    flask.session[AUTH_STATE_KEY] = state
    flask.session.permanent = True

    return flask.redirect(uri, code=302)

@app.route('/google/auth')
@no_cache
def google_auth_redirect():
    req_state = flask.request.args.get('state', default=None, type=None)

    if req_state != flask.session[AUTH_STATE_KEY]:
        response = flask.make_response('Invalid state parameter', 401)
        return response

    session = OAuth2Session(CLIENT_ID, CLIENT_SECRET,
                            scope=AUTHORIZATION_SCOPE,
                            state=flask.session[AUTH_STATE_KEY],
                            redirect_uri=AUTH_REDIRECT_URI)

    oauth2_tokens = session.fetch_access_token(
                        ACCESS_TOKEN_URI,
                        authorization_response=flask.request.url)

    flask.session[AUTH_TOKEN_KEY] = oauth2_tokens

    return flask.redirect(BASE_URI, code=302)

@app.route('/google/logout')
@no_cache
def logout():
    flask.session.pop(AUTH_TOKEN_KEY, None)
    flask.session.pop(AUTH_STATE_KEY, None)

    return flask.redirect(BASE_URI, code=302)
This contains all the code that we need to authenticate with Google via the Google Login API and fetch information about the current user.
Some highlights and points of note:
- We’re fetching FN_CLIENT_ID, FN_CLIENT_SECRET, etc from environment variables via os.environ.get
- The OAuth 2.0 Scope in AUTHORIZATION_SCOPE contains “openid email profile” which means that we’ll be authenticating with OpenID Connect, will have access to the user’s email address, and have access to basic user profile info, such as the user’s first name.
- We’re preventing browser caching of responses from the login/logout endpoints via a custom no_cache function decorator
- In login, we’re storing the OAuth state parameter in the Flask session using AUTH_STATE_KEY
- In google_auth_redirect we’re verifying the state parameter on the URL is the same as we previously saved to the session. This mitigates Cross-Site Request Forgery (CSRF) attacks.
- get_user_info, which performs a request to get Google user profile info, and returns a dictionary containing the data.
To use the google_auth module, create a file called app.py containing the following:
import functools
import json
import os

import flask

from authlib.client import OAuth2Session
import google.oauth2.credentials
import googleapiclient.discovery

import google_auth

app = flask.Flask(__name__)
app.secret_key = os.environ.get("FN_FLASK_SECRET_KEY", default=False)

app.register_blueprint(google_auth.app)

@app.route('/')
def index():
    if google_auth.is_logged_in():
        user_info = google_auth.get_user_info()
        return '<div>You are currently logged in as ' + user_info['given_name'] + '<div><pre>' + json.dumps(user_info, indent=4) + "</pre>"

    return 'You are not currently logged in.'
Create a script to start the app
If you’re using the bash shell, create a run.sh file at your project root that looks like:
export FN_AUTH_REDIRECT_URI=http://localhost:8040/google/auth
export FN_BASE_URI=http://localhost:8040
export FN_CLIENT_ID=THE CLIENT ID WHICH YOU CREATED EARLIER
export FN_CLIENT_SECRET=THE CLIENT SECRET WHICH YOU CREATED EARLIER

export FLASK_APP=app.py
export FLASK_DEBUG=1
export FN_FLASK_SECRET_KEY=SOMETHING RANDOM AND SECRET

python -m flask run -p 8040
If you’re using Windows, create a run.bat file that looks like:
set FN_AUTH_REDIRECT_URI=http://localhost:8040/google/auth
set FN_BASE_URI=http://localhost:8040
set FN_CLIENT_ID=THE CLIENT ID WHICH YOU CREATED EARLIER
set FN_CLIENT_SECRET=THE CLIENT SECRET WHICH YOU CREATED EARLIER

set FLASK_APP=app.py
set FLASK_DEBUG=1
set FN_FLASK_SECRET_KEY=SOMETHING RANDOM AND SECRET

python -m flask run -p 8040
In the scripts above:
FN_AUTH_REDIRECT_URI should be the OAuth redirect URI which you set up earlier
FN_CLIENT_ID Should be set to the Google OAuth client id which you saved earlier
FN_CLIENT_SECRET Should be set to the Google OAuth client secret which you saved earlier
FN_FLASK_SECRET_KEY should be a random value. This will be used for encrypting the cookie in the Flask session.
It’s important to keep these values secret. Do not check them into source control.
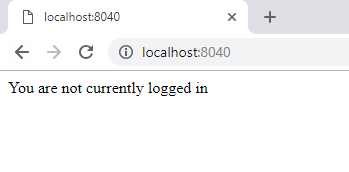
Start Flask via either run.bat or run.sh, and in your browser, navigate to http://localhost:8040. If everything is working correctly, you should see something that looks like the following:
If you get any errors in the above process, there’s more info on setting up a Flask app is in the Flask Quickstart. Otherwise, leave a comment below.
Logging in with Google
With the Flask app up and running, navigate to http://localhost:8040/google/login, and you should be redirected to the Sign in with Google screen which looks something like the screenshot below.
Note how the page says that “Google will share your name, email address and profile picture” - this is because we specified the email and profile scopes in AUTHORIZATION_SCOPE.
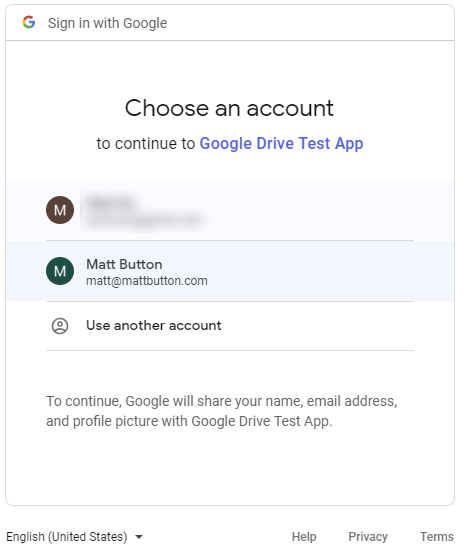
Select an account to sign with.
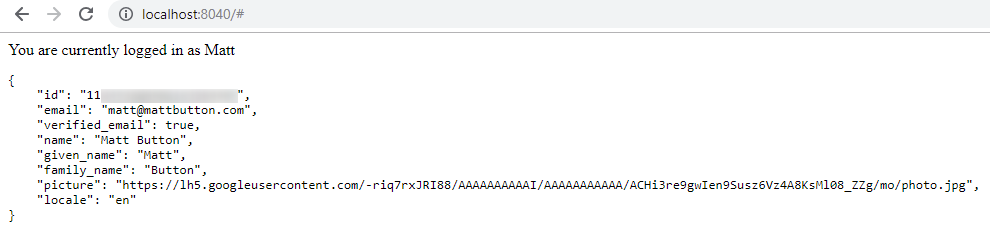
Once you have successfully logged in, you should see a screen that looks something like:
To log out, navigate to http://localhost:8040/google/logout. You should see a screen that looks like:
Now we have a Python app which supports Google Authentication - if that’s all you need, feel free to stop here. Otherwise, continue reading to learn about how to connect our app to the user’s Google Drive.
Adding support for Google Drive OAuth scopes
Now let’s enable support for the Google Drive scope which allows our app to read and write files on Google Drive which were created by our app.
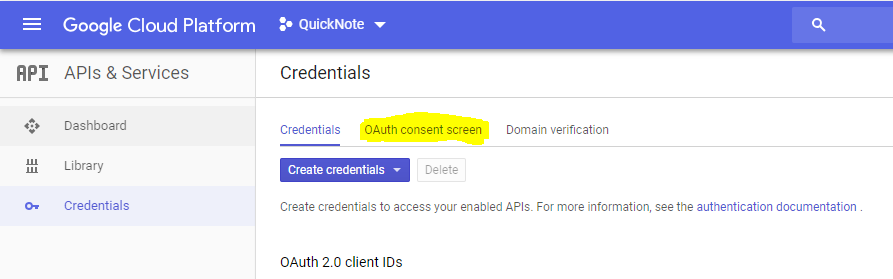
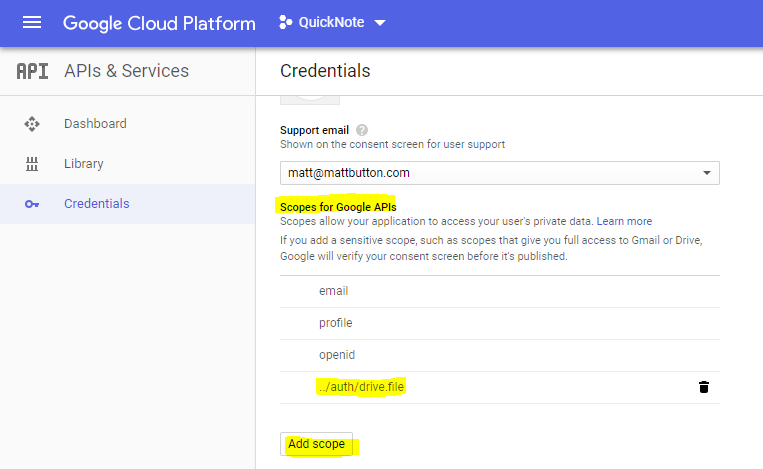
Navigate to the OAuth consent screen in the Google API console:
Scroll down to the Scopes for Google APIs and add the ../auth/drive.file scope:
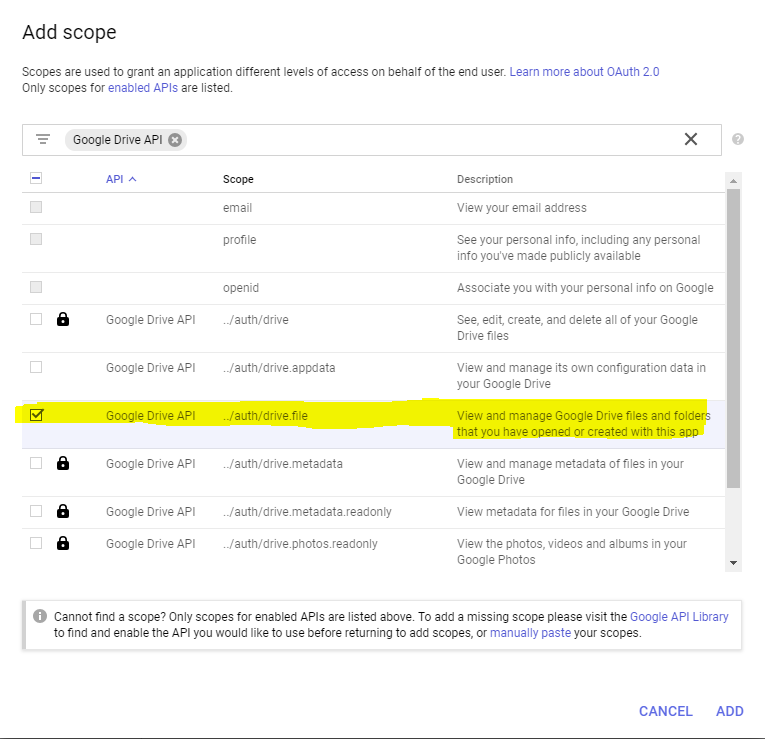
Your Scopes for Google APIs should now look like this:
In google_auth.py, update AUTHORIZATION_SCOPE to include the Google Drive scope. It should look something like:
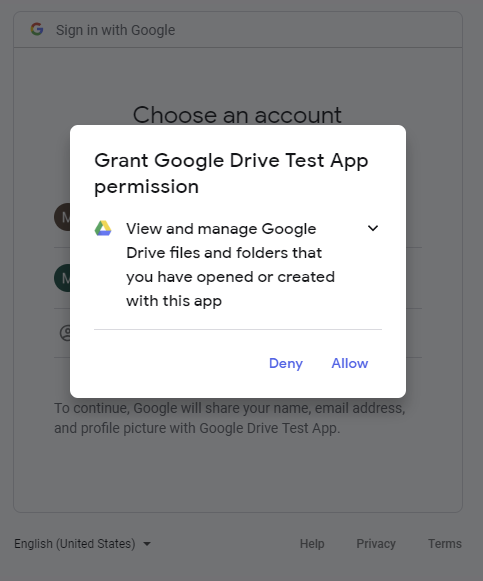
AUTHORIZATION_SCOPE ='openid email profile https://www.googleapis.com/auth/drive.file'Now, if you log into the app, you’ll see a second consent screen which prompts the user to allow the app to access to Google Drive:
Now that we’ve updated the Google API settings to support the drive.file scope, and have updated our app to request the drive.file scope on login, we can move on to setting up the app to read from and write to the user’s Google Drive.
Calling the Google Drive API with Python
Add a file called google_drive.py with the following:
import io
import tempfile

import flask

from apiclient.http import MediaIoBaseDownload, MediaIoBaseUpload
import googleapiclient.discovery
from google_auth import build_credentials, get_user_info

from werkzeug.utils import secure_filename

app = flask.Blueprint('google_drive', __name__)

def build_drive_api_v3():
    credentials = build_credentials()
    return googleapiclient.discovery.build('drive', 'v3', credentials=credentials).files()
We’re also importing the google_auth module which we created earlier:
- build_credentials will be important for accessing the user’s Google Drive
- get_user_info will be used to display information about the current user on the page.
The build_drive_api_v3() method creates a Drive API files instance which will be used whenever we need to create/read/update files in the user’s Google Drive.
Import google_drive in app.py:
import google_driveRegister the google_drive blueprint by adding the following to app.py:
app.register_blueprint(google_drive.app)Flask template for the Google Drive list view
Next, we’ll start building the Flask Template for the view that you saw in the screenshot at the beginning of this post.
In the code below, we’re using the Bootstrap starter template as the foundation, then will be adding:
- A nav header displaying the users given name and a logout button
- A form so that you can upload new files
- A list of files that have been previously uploaded
- Links next to each file, so that they can be viewed in the app
Update the index method in app.py so that it looks like:
@app.route('/')
def index():
    if google_auth.is_logged_in():
        return flask.render_template('list.html', user_info=google_auth.get_user_info())

    return 'You are not currently logged in.'
Add the following modified Bootstrap starter template to a templates/list.html - this will be rendered via the Flask render_template call above.
<!doctype html>
<html lang="en">
  <head>
    <meta charset="utf-8">
    <meta name="viewport" content="width=device-width, initial-scale=1, shrink-to-fit=no">
    <link rel="stylesheet" href="https://stackpath.bootstrapcdn.com/bootstrap/4.1.3/css/bootstrap.min.css" integrity="sha384-MCw98/SFnGE8fJT3GXwEOngsV7Zt27NXFoaoApmYm81iuXoPkFOJwJ8ERdknLPMO" crossorigin="anonymous">
    <title>Google Drive File Browser</title>
  </head>
  <body>
    <nav class="navbar navbar-expand-lg navbar-light bg-light">
      <div class="container">
          <a class="navbar-brand" href="#">Google Drive File Browser</a>
          <ul class="navbar-nav mr-auto"></ul>
          <span class="navbar-text mr-2">
            Currently logged in as {{ user_info['given_name'] }}
          </span>
          <a href="/google/logout" class="btn btn-primary" role="button" aria-pressed="true">Logout</a>
      </div>
    </nav>
    <div class="container">
        <!-- We'll add code here in the next couple of sections -->
    </div>
    <script src="https://code.jquery.com/jquery-3.3.1.slim.min.js" integrity="sha384-q8i/X+965DzO0rT7abK41JStQIAqVgRVzpbzo5smXKp4YfRvH+8abtTE1Pi6jizo" crossorigin="anonymous"></script>
    <script src="https://cdnjs.cloudflare.com/ajax/libs/popper.js/1.14.3/umd/popper.min.js" integrity="sha384-ZMP7rVo3mIykV+2+9J3UJ46jBk0WLaUAdn689aCwoqbBJiSnjAK/l8WvCWPIPm49" crossorigin="anonymous"></script>
    <script src="https://stackpath.bootstrapcdn.com/bootstrap/4.1.3/js/bootstrap.min.js" integrity="sha384-ChfqqxuZUCnJSK3+MXmPNIyE6ZbWh2IMqE241rYiqJxyMiZ6OW/JmZQ5stwEULTy" crossorigin="anonymous"></script>
    <!-- Add additional script blocks here -->
  </body>
</html>
The only modification to the Bootstrap starter template is the nav section, which contains the Logout button, and will be used to display the current user’s first name.
Creating files in Google Drive with Python
Add the following save_image method to the end of google_drive.py:
def save_image(file_name, mime_type, file_data):
    drive_api = build_drive_api_v3()

    generate_ids_result = drive_api.generateIds(count=1).execute()
    file_id = generate_ids_result['ids'][0]

    body = {
        'id': file_id,
        'name': file_name,
        'mimeType': mime_type,
    }

    media_body = MediaIoBaseUpload(file_data,
                                   mimetype=mime_type,
                                   resumable=True)

    drive_api.create(body=body,
                     media_body=media_body,
                     fields='id,name,mimeType,createdTime,modifiedTime').execute()

    return file_id
This is the code that we need to upload to Google Drive.
We’re using:
- The Drive API generateIds method to create the file_id used in the create request, and will be used to fetch files toward the end of this blog post.
- MediaIoBaseUpload to instantiate media_body. MediaIoBaseUpload used the file_data object, which is a standard Python file object.
- The Drive API create method to upload the file to Google Drive
Post Multipart Form Data to a Python Flask endpoint
Add this Flask API endpoint to which will recieve the uploaded file data to google_drive.py:
@app.route('/gdrive/upload', methods=['GET', 'POST'])
def upload_file():
    if 'file' not in flask.request.files:
        return flask.redirect('/')

    file = flask.request.files['file']
    if (not file):
        return flask.redirect('/')

    filename = secure_filename(file.filename)

    fp = tempfile.TemporaryFile()
    ch = file.read()
    fp.write(ch)
    fp.seek(0)

    mime_type = flask.request.headers['Content-Type']
    save_image(filename, mime_type, fp)

    return flask.redirect('/')
In the code above we’re:
- Fetching the uploaded file with name ‘file’ from flask.request.files - we’ll need to specify name=file in the upload form too
- Calling Flask’s secure_filename method, which is generally just good practice to help sanitise any input from the user
- Saving the image to Google Drive via the save_image method that we created earlier
Add the following to template/list.html, within the container div:
<h3>Upload a new file</h3>
<form method='POST' enctype='multipart/form-data' action="/gdrive/upload">
  <div class="input-group mb-3">
    <div class="custom-file">
      <input type="file" name="file" class="custom-file-input" id="inputGroupFile01" aria-describedby="inputGroupFileAddon01">
      <label class="custom-file-label" for="inputGroupFile01">Choose file</label>
    </div>
    <div class="input-group-append">
      <input class="input-group-text" type="submit" value="Upload" />
    </div>
  </div>
</form>
Add this script block after the jQuery script block in template/list.html:
<script>
    $('.custom-file-input').on('change', function() {
        let fileName = $(this).val().split('\\').pop();
        $(this).next('.custom-file-label').addClass("selected").html(fileName);
    });
</script>
Start the app, and navigate to http://localhost:8040 - you should see the upload form, and be able to upload a file to your Google drive.
If you get an error such as:
Insufficient Permission: Request had insufficient authentication scopes.It means that you’re still logged in with a session using the old scopes (openid email profile) and are missing the Google Drive scope. In order to get a session which includes the Google Drive scope that you added earlier, you need to log out and log in again.
After uploading the file, navigate over to https://drive.google.com - you should see the new file in your Google Drive.
Getting a list of files in Google Drive with Python
Currently our app only supports uploading of files to Googe Drive, but no way to get a list of previously uploaded files, or viewing individual files
In this step, we’ll add support for listing files that were previously uploaded by our app.
In app.py, update the index() method so that it looks like this:
@app.route('/')
def index():
    if google_auth.is_logged_in():
        drive_fields = "files(id,name,mimeType,createdTime,modifiedTime,shared,webContentLink)"
        items = google_drive.build_drive_api_v3().list(
                        pageSize=20, orderBy="folder", q='trashed=false',
                        fields=drive_fields
                    ).execute()

        return flask.render_template('list.html', files=items['files'], user_info=google_auth.get_user_info())

    return 'You are not currently logged in.'
In this update, we’re fetching files from Google drive via a call to list, and using the fields parameter to specify the data that we want to fetch.
The fields parameter took me a while to figure out. The V2 version of the Google API provided data for createdTime, webContentLink, etc by default, whereas the V3 doesn’t - you must use the fields parameter to specify the fields that you want returned in the API response.
Confusingly, you won’t see it mentioned in the docs for the Google Drive API list method method, however the fields parameter is documented in the:
- Drive API Python Quickstart
- Google API Standard Fields document
- Partial response (fields parameter) document
Displaying the list of files in Google Drive
Now that we have our /gdrive endpoint, we’ll set up the Flask template to display the list of recently uploaded files.
In template/list.html, add a section to list files which were recently uploaded by our app to Google Drive.
Directly below the upload form which you added above, add the following:
<h3>Recent Files</h3>
<table class="table">
<thead>
  <tr>
    <th scope="col">Name</th>
    <th scope="col">Mime Type</th>
    <th scope="col">Created Time</th>
    <th scope="col"></th>
  </tr>
</thead>
<tbody>
  {% for file in files %}
  <tr>
    <td>{{ file['name'] }}</td>
    <td>{{ file['mimeType'] }}</td>
    <td>{{ file['createdTime'] }}</td>
    <td><a href="/gdrive/view/{{file['id']}}">View</a></td>
  </tr>
  {% endfor %}
</tbody>
</table>
This iterates over the files that we specified as part of flask.render_template, and displays them one-by-one, along with a link to view the file. The View link won’t work just yet. We’ll set that up in the next step.
Downloading files from Google Drive with Python
Now that we’ve added support for uploading files, and displaying a list of previously uploaded files, we’ll add support for viewing an individual uploaded file.
Add a file called google_drive.py with the following:
@app.route('/gdrive/view/<file_id>', methods=['GET'])
def view_file(file_id):
    drive_api = build_drive_api_v3()

    metadata = drive_api.get(fields="name,mimeType", fileId=file_id).execute()

    request = drive_api.get_media(fileId=file_id)
    fh = io.BytesIO()
    downloader = MediaIoBaseDownload(fh, request)

    done = False
    while done is False:
        status, done = downloader.next_chunk()

    fh.seek(0)

    return flask.send_file(
                     fh,
                     attachment_filename=metadata['name'],
                     mimetype=metadata['mimeType']
               )
This is the endpoint called by the link to /gdrive/view/{{file[‘id’]}} in the table which you added in the section above.
Flask’s send_file() method is used to
You’re done! Start the app and test it out
Start up the app via run.bat, navigate to http://localhost:8040/gdrive and you should see the Google Drive File Browser that we’ve created.
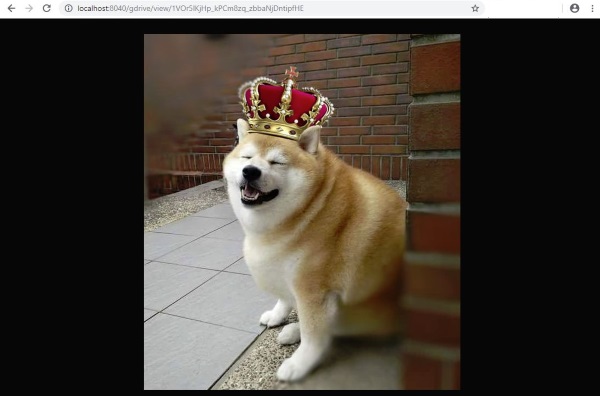
In the screenshot below, you can see that I’ve already uploaded happy-doge.jpg to my Google Drive:
Try uploading some image files, and viewing them via the ‘View’ link. The page that you see should display the image that you’ve uploaded.
Here’s what it looks like after I click the View link on happy-doge.jpg:
The code is available on GitHub
If you’re stuck, or just want the code, check out: https://github.com/mattbutton/google-authentication-with-python-and-flask
Where to next?
In this blog post, I’ve covered:
- The basics of getting Google authentication to work with Python and Flask.
- How to insert and delete files from a user’s Google Drive
Security is a big topic, and the advice this blog post doesn’t come with any warranty or guarantees. This blog post is intended as a “getting started” article, and does not provide comprehensive security advice.
If you’re planning on hosting your app in production, there are some additional security considerations to be made. Among other things:
- Use HTTPS
- Read over the Flask Security Considerations especially the part about Cross-Site Request Forgery (CSRF) and Set-Cookie options
- Consider only allowing a certain set of file extensions can be uploaded. More info in the Flask docs: Uploading Files with Flask
Thanks for reading!
If you like this blog post, have any feedback, or any questions, please get in touch, or leave a comment below.