How I host and update www.mattbutton.com on AWS with CloudFlare and Amazon S3 Static Website Hosting
- Nov 4, 2017
I’ve been hosting this blog on Amazon S3 for a few months now, and thought it would be a good idea to write about how it’s set up, in case future me needs to refer to it, and to give pointers to anybody else who is interested in setting up their own website using Amazon S3, HTTPS, and the CloudFlare CDN.
Hosting this website costs cents per month, and avoids security risks of other blog platforms such as Wordpress by being purely static, consisting just regular HTML files, JavaScript, and images; which means no PHP, .NET, etc. This works well with what I need in a blog.
Hosting www.mattbutton.com using S3 Static Website Hosting
Here’s a screenshot of the bucket properties for www.mattbutton.com, which contains this entire website:
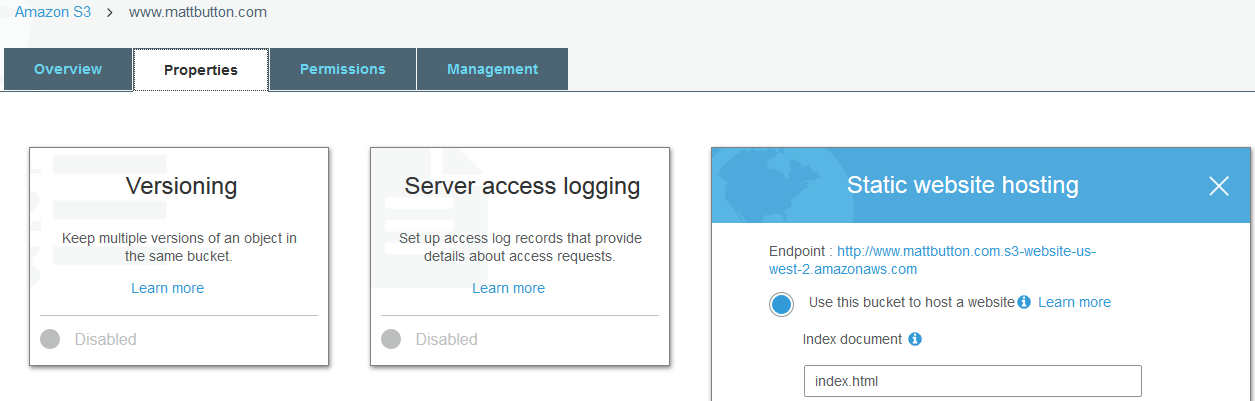
This is enough to host a static website based on the URL you see next to “Endpoint:” in the screenshot. More info here: Hosting a Static Website on Amazon S3
If you want to use your own domain name, or if you want to do redirects between different subdomains etc, then there’s a bit more to configure, so read on!
Using a Bucket Policy to enable read access for everybody
In order to ensure that the objects in S3 can be read by CloudFlare, I set up the following bucket policy which allows PublicReadGetObject access for CloudFlare IP addresses:
{
    "Version": "2012-10-17",
    "Statement": [
        {
            "Sid": "PublicReadGetObject",
            "Effect": "Allow",
            "Principal": "*",
            "Action": "s3:GetObject",
            "Resource": "arn:aws:s3:::www.mattbutton.com/*",
            "Condition": {
                "IpAddress": {
                    "aws:SourceIp": [
                        "103.21.244.0/22",
                        "103.22.200.0/22",
                        "103.31.4.0/22",
                        "104.16.0.0/12",
                        "108.162.192.0/18",
                        "131.0.72.0/22",
                        "141.101.64.0/18",
                        "162.158.0.0/15",
                        "172.64.0.0/13",
                        "173.245.48.0/20",
                        "188.114.96.0/20",
                        "190.93.240.0/20",
                        "197.234.240.0/22",
                        "198.41.128.0/17",
                        "2400:cb00::/32",
                        "2405:8100::/32",
                        "2405:b500::/32",
                        "2606:4700::/32",
                        "2803:f800::/32",
                        "2c0f:f248::/32",
                        "2a06:98c0::/29"
                    ]
                }
            }
        }
    ]
}
Also note that the bucket policy overrides any ACLs which you have on the individual files, which means that it doesn’t matter if any of the files in the bucket are individually flagged as private; this bucket policy will force them to be public to CloudFlare.
Redirecting from mattbutton.com to www.mattbutton.com
In order to ensure that all HTTP/HTTPS requests to mattbutton.com get redirected to https://www.mattbutton.com, which is the URL that this blog is actually hosted on, we need a second bucket configured for static website hosting, that will perform a 302 redirect:
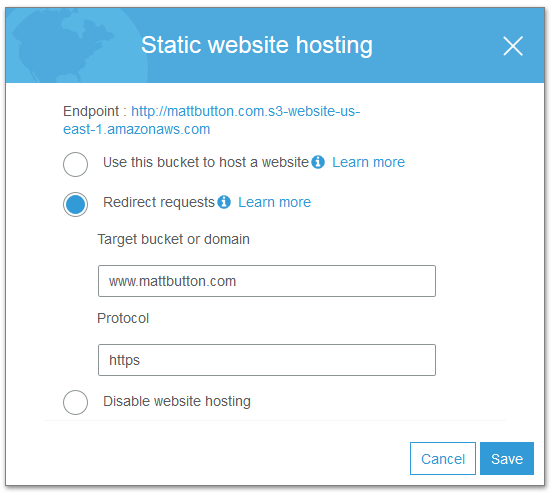
Note that the protocol is https - I’m using CloudFlare’s CDN, and have HTTPS configured.
Supporting HTTPS via the CloudFlare CDN
CloudFlare lets the URL of this blog be https://www.mattbutton.com
Prior to hosting this blog on Amazon S3, I was using Aerobatic.io. They increased the price of their plans, so I looked at other options, ultimately deciding to move to S3.
I wanted to run this site on HTTPS, and I originally planned to use Amazon CloudFront for the CDN, however CloudFront already had a distribution for mattbutton.com configured, and owned by the Aerobatic account, which prevented me from setting up a www.mattbutton.com distribution for my account, so I had to look at other options. CloudFlare has a great free plan, so I decided to go with that.
In order to use CloudFlare, it’s important that the S3 bucket names match the domain CNAME.
As above, we’ve got two buckets in Amazon S3:
- www.mattbutton.com (which contains all the content)
- mattbutton.com (which is set up to redirect to https://www.mattbutton.com)
I’ve got the following CNAMEs set up in CloudFlare:

Using CloudFlare nameservers on the mattbutton.com domain
Make sure you also have your domain name set up to point to the CloudFlare Nameservers. In this case, I’m using Namecheap:

Watch out for a CloudFlare 502 - Bad Gateway Error
Getting S3 static website integrated with CloudFlare was not an entirely smooth process, as I ended up with a 502 Bad Gateway error.
Essentially, to work around the issue I enabled CloudFlare Flexible SSL:
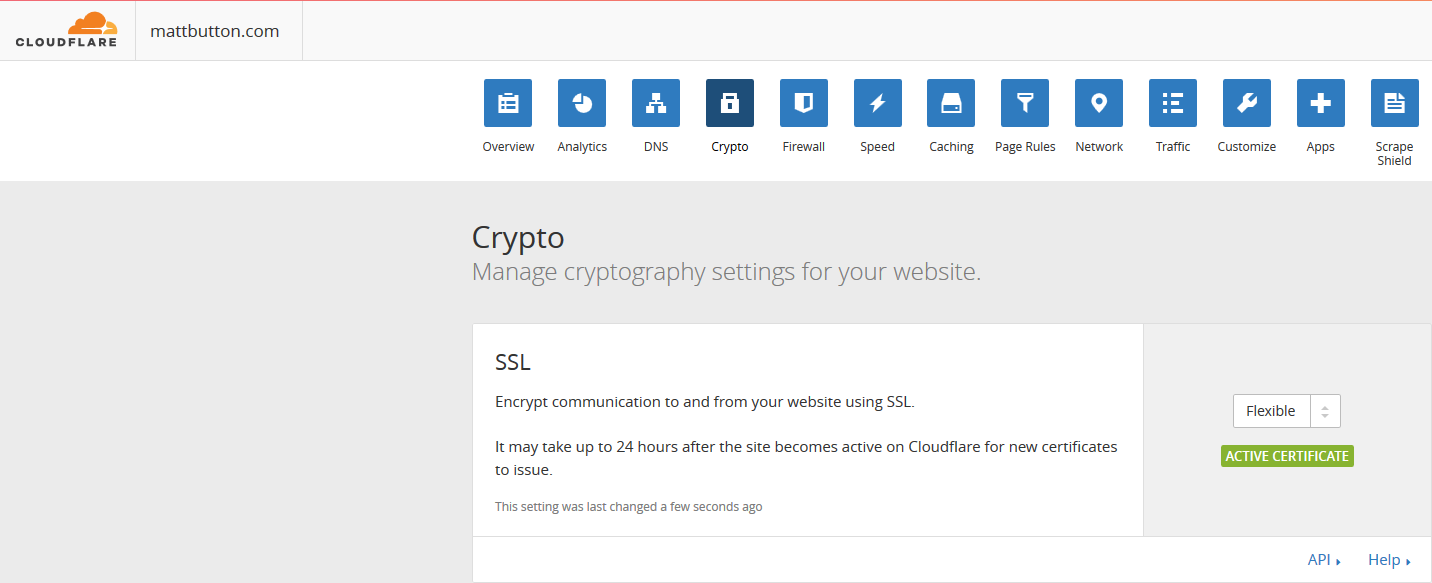
Flexible SSL means that there will be a secure connection between the site visitor and CloudFlare, but no secure connection between CloudFlare and Amazon S3. In the context of this blog, I don’t really need SSL between S3 and CloudFlare, so Flexible SSL is fine in this scenario.
If you want to read more on the backround of how I worked around the issue, you can read more about it here.
Uploading the static website to the www.mattbutton.com S3 bucket using s3deploy
I use s3deploy to update the static website in S3 with the following command:
~/go/bin/s3deploy -bucket www.mattbutton.com -region us-west-2 -source public
This sits as a bash shell script called upload.sh within a folder structure that looks like:
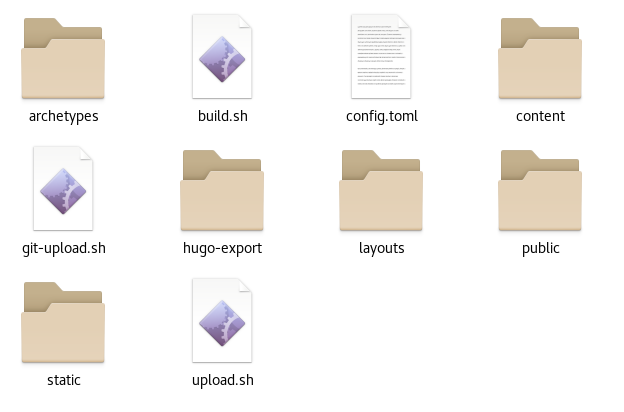
The -source parameter is the folder containing the pre-built static website, which will contain your index.html file, etc.
I use s3deploy because it only updates files that have changed, meaning that for unchanged files, the file modification timestamps doesn’t get reset on S3.
Other tools I looked at to upload files to S3 would re-upload all files, including unchanged ones, and invalidate caches, causing the user’s browser to re-download any previously cached images.
Watch out for broken images in your S3 static website if you’re using s3deploy on Windows
I’m not sure if is still the case, but back when I first stared using s3deploy on Windows, it would upload to S3 using back slashes in the object key, rather than forward slashes, i.e. the object key was:
images\2017\static-website-folder-structure.png
This is not a path that we can use in a valid URL for a S3 Static Website, and is related to the fact that Windows uses backslashes in filesystem paths, ultimately causing images in the blog to break. What we really want is:
images/2017/static-website-folder-structure.png
To work around this, I switched to Linux, which has a filesystem that uses forward slashes in filesystem paths.
So, unless that issue has been fixed, I recommend you use s3deploy on Linux or MacOS
Any feedback?
Let me know in the comments below.