Redux made easy with Redux Toolkit and Typescript
- Jan 20, 2020
Using Redux with React can be incredibly challenging for people to get their head around; while the core principles of Redux itself are fairly straightforward and don’t take too long to grasp, a lot of people struggle with using Redux in React apps. Partly because there are so many damn things to integrate:
- Redux
- React Redux
- Redux Thunk
- Typescript (getting more common in recent years)
- Redux Saga / Redux Observable (in more complex apps)
I spotted this quote which summed it up for me:
Redux was such a mental overhead for me when I started out with it. The amount of boilerplate code that I had to write for the project I worked on was very frustrating.
I struggled with that stuff too, even after I became familiar with the concepts, I often found it difficult to understand the flow of data and events within React Redux apps. This is not uncommon, even the original author of Redux had this to say:
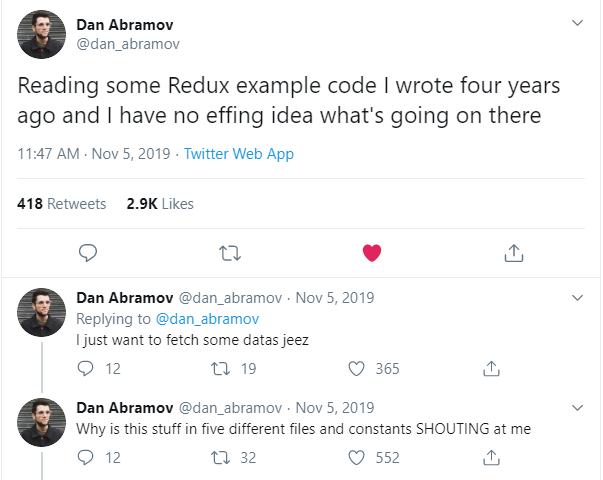
Yup. Can totally relate.
Then I found Redux Toolkit, written by the maintainers of Redux, and recommended by the Redux style guide.
Redux Toolkit gives you:
- An opinionated way of writing and structuring Redux code
- A batteries-included approach to building React + Redux + Typescript apps
- Some handy helpers to cut down boilerplate
- Immer integration, which means that you no longer need to do manual management of immutability… but still can if you want to (we’ll cover exactly what this means later in this tutorial)
Redux Toolkit will help you massively cut down cognitive load, so that you can focus more on building your app, spending less time on plumbing and trying to figure out WTF is going on with Redux.
In this tutorial, I’ll cover:
- How Redux Toolkit reduces verbosity, cuts down on boilerplate, and the cognitive load traditionally associated with Redux
- How to use Redux with React and Typescript
- How to write the Redux Todo List sample using Redux Toolkit
- Extending the React Todo List sample to show you how to do API calls with React and Redux
Let’s get started
We’ll be using npx along with create-react-app to set up our app. create-react-app doesn’t need to be installed, and npx comes with Node 5+. If you don’t already have Node installed, you can get it here.
Create a new React app with Typescript support:
npx create-react-app rtk-todo --template typescriptThen cd into the rtk-todo folder:
cd rtk-todoI’ve seen some cases where the react and react-dom typescript type definitions aren’t automatically installed as part of create react app, resulting an error such as: Could not find a declaration file for module 'react', so to be on the safe side, install them now:
npm install @types/react @types/react-domCheck that the app runs:
npm startYou should see something like this:
Install Prettier for automatic code styling:
npm install prettierWondering why we’re not doing npm install --save or --save-dev ?
- As of NPM 5, saving is done by default
--save-devis only needed if we’re building a node app; since we output minified JS for production vianpm run build, everything is a dev dependency, so it doesn’t actually matter in practice whether modules are added to dependencies or devDependencies in package.json.
Next, we’ll enable absolute imports, which will make imports easier to read when there is folder nesting. This means that if we have something nested within components i.e. components/foo/bar/Widget.js that wants to import components/Button.js, we can:
import Button from 'components/Button'rather than:
import Button from '../../Button'As a general rule, consider relative paths when importing modules less than two levels up, and absolute imports otherwise.
To enable absolute imports, add the following to the compilerOptions section of tsconfig.json:
"baseUrl": "src",Code Cleanup
There’s a bunch of stuff in the default Create React App that we’re not going to use, so in the src folder:
- Delete the contents of
App.css- we’ll be replacing this with our own CSS later. - Delete
App.test.tsx- we’ll be writing our own tests later. - Delete
logo.svg- we won’t be needing this anymore.
If you’re not super familiar with React, you can think of JSX as a syntax extension of javascript, and TSX as the typescript equivalent.
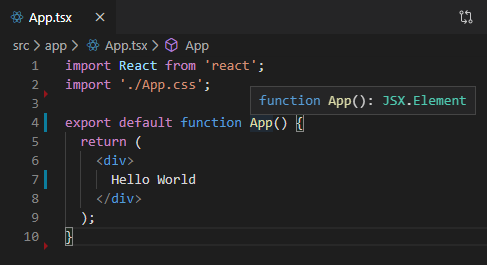
Replace the contents of App.tsx with the following:
import React from 'react';
import './App.css';

export default function App() {
  return (
    <div>
      Hello World
    </div>
  );
}
This declares App as a Function Component, and Typescript will automatically infer that a JSX.Element will be returned… so no need to specify React.FC or anything like that:
We’ll declare all of our components as function components for the sake of consistency.
There are a few different ways of declaring function components. The above is modeled after the Airbnb style guide which recommends normal functions over arrow functions.
Project Structure
When working on React projects, I like to use the feature folder approach, for this project, we’ll follow the following “feature folder” structure as recommended in the Redux style guide:
src/api: functions for API interactions, and corresponding Typescript typessrc/app: the main<App>componentsrc/components: components that are reused in multiple placessrc/features:src/features/todoList: components for displaying the todo listsrc/features/visibilityFilter: components which control filtering of todo itemssrc/utils: various string utility functions
To align the default Create React app code with this structure:
- Create an
appfolder undersrc, and moveApp.tsx,App.test.tsxandApp.cssinto it - Now in
index.tsxfix up the import statement for App by replacing:
import App from './App';with:
import App from './app/App';Check the application still works. You should see:
Failed to Compile?
When moving files around, you may get a Failed to compile error in the browser, which will look like this:
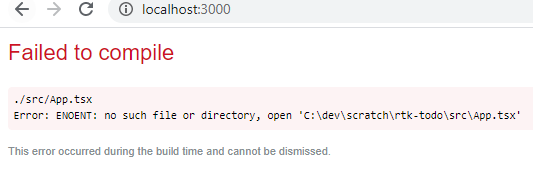
When files change location, sometimes npm can get confused. To fix, restart npm to fix.
Redux Setup
Now we’ll set up Redux, Redux Toolkit, React Redux and Typescript type definitions. Start by running:
npm install @reduxjs/toolkit react-redux @types/react-reduxWe’ll be using Webpack hot module replacement so that we can update our code without requiring a full refresh, preserving state in the process, so in order to avoid Typescript errors, we’ll need to install some Webpack type definitions:
npm install @types/webpack-envNow, we’ll set up a store and root reducer.
Create src/app/rootReducer.ts, and add the following:
import { combineReducers } from '@reduxjs/toolkit'

const rootReducer = combineReducers({})

export type RootState = ReturnType<typeof rootReducer>

export default rootReducer
This sets up an empty rootReducer, which we’ll later add our reducers to.
If you want to read more about reducers, take a look at the official Redux docs: Redux Reducers
We also declared RootState, which we’ll use in our selectors, for strongly-typed access to our Redux state. I’ll show you more about this later in the tutorial.
Create src/app/store.ts, and add the following:
import { configureStore, Action } from '@reduxjs/toolkit'
import { ThunkAction } from 'redux-thunk'

import rootReducer, { RootState } from './rootReducer'

const store = configureStore({
  reducer: rootReducer
})

if (process.env.NODE_ENV === 'development' && module.hot) {
  module.hot.accept('./rootReducer', () => {
    const newRootReducer = require('./rootReducer').default
    store.replaceReducer(newRootReducer)
  })
}

export type AppDispatch = typeof store.dispatch
export type AppThunk = ThunkAction<void, RootState, null, Action<string>>

export default store
This sets up our redux store, which will contain all state that we put into Redux, along with the Webpack hot module replacement support for the reducer.
Similarly to above, where we export RootState, we also export types for AppDispatch and AppThunk. Whenever we use dispatch, it’s type will be AppDispatch, and whenever we use a thunk for API calls / async logic, it’s type will be AppThunk. This will be clearer when we use it later in the tutorial.
Finally, replace the content of index.tsx with the following:
import React from 'react'
import ReactDOM from 'react-dom'
import { Provider } from 'react-redux'

import * as serviceWorker from './serviceWorker';
import store from './app/store'
import './index.css'

function render() {
  const App = require('./app/App').default
  ReactDOM.render(
    <Provider store={store}>
      <App />
    </Provider>,
    document.getElementById('root')
  )
}

render()

if (process.env.NODE_ENV === 'development' && module.hot) {
  module.hot.accept('./app/App', render)
}
Now, we’ve enabled Webpack hot module replacement for App, and wrapped App with a Redux Provider which makes the store available to all the components nested within App.
This completes the steps required to wire our app up with Redux. If you have the Redux DevTools for Chrome or Redux DevTools for Firefox installed, you should now be able to open up the developer console (F12 in Chrome in Windows or command + shift + E on Mac), and see the Redux tab:
Creating our Actions and Reducers
Create src/features/todoList/types.ts:
export interface Todo {
    id: string,
    completed: boolean
    text: string,
}
Create src/features/todoList/todoSlice.ts with the following:
import { createSlice, PayloadAction } from '@reduxjs/toolkit';

import { AppThunk, AppDispatch } from 'app/store'
import { Todo } from 'features/todoList/types';

const initialState : Todo[] = [];

const todoSlice = createSlice({
    name: 'todos',
    initialState,
    reducers: {
        addTodo(state, action: PayloadAction<Todo>) {
            state.push(action.payload);
        },
        toggleTodo(state, action: PayloadAction<Todo>) {
            let todo = state.find(todo => todo.id === action.payload.id);

            if (todo) {
                todo.completed = !todo.completed;
            }
        },
    }
});

export const { toggleTodo } = todoSlice.actions;

export const addTodo = (
    text: string
): AppThunk => async (dispatch: AppDispatch) => {
    const newTodo : Todo = {
        id: Math.random().toString(36).substr(2, 9), // https://gist.github.com/gordonbrander/2230317,
        completed: false,
        text: text,
    }

    dispatch(todoSlice.actions.addTodo(newTodo))
}

export default todoSlice.reducer;
Above, we use createSlice, which is one of the magical functions provided by Redux Toolkit, replacing much of the boilerplate traditionally associated with Redux. From the docs:
[createSlice is] a function that accepts an initial state, an object full of reducer functions, and a "slice name", and automatically generates action creators and action types that correspond to the reducers and state.
Actions are strongly typed with PayloadAction, so that the addTodo action only supports object of type Todo.
Note that within the reducer, we’re modifying state with state.push, and within toggleTodo, we’re filtering for the todo to toggle, and updating it directly. This is possible because of Redux Toolkit’s Immer integration, which sets up a proxy for the current state, making it safe to mutate. Once mutations are complete, Immer handles computing the next state, meaning that we can mutate our state by simplify modifying it, letting Immer look after immutability.
The building of the Todo item has been moved out of the reducer, into a separate addTodo function, using AppThunk and AppDispatch; it’s essential to ensure that reducers must not have side effects, which means that we must not execute any kind of asynchronous logic, or generate random values, etc within.
Since createSlice has taken care of building the reducer, we export it via: export default todoSlice.reducer
Now we’ll use the same concepts from todoSlice to create src/features/visibilityFilter/visibilityFilterSlice.ts with the following:
import { createSlice, PayloadAction } from '@reduxjs/toolkit';

export enum VisibilityFilter {
  ShowAll = "SHOW_ALL",
  ShowCompleted = "SHOW_COMPLETED",
  ShowActive = "SHOW_ACTIVE",
}

const initialState = VisibilityFilter.ShowAll;

const visibilityFilterSlice = createSlice({
  name: 'visibilityFilter',
  initialState,
  reducers: {
    setVisibilityFilter(state, action: PayloadAction<VisibilityFilter>) {
      return action.payload;
    }
  }
});

export const { setVisibilityFilter } = visibilityFilterSlice.actions;

export default visibilityFilterSlice.reducer;
Wire up our new reducers by replacing the contents of src/app/rootReducer.ts with:
import { combineReducers } from '@reduxjs/toolkit'

import todos from 'features/todoList/todoSlice';
import visibilityFilter from 'features/visibilityFilter/visibilityFilterSlice';

const rootReducer = combineReducers({
  todos,
  visibilityFilter
})

export type RootState = ReturnType<typeof rootReducer>

export default rootReducer
Now if you take another look at the Redux console, and select the State tab, you should see an empty array of todos, and the default visibilityFilter of SHOW_ALL in the Redux state:
Adding Todo items
Create src/features/todoList/AddTodo.tsx:
import React from 'react'
import { useDispatch } from 'react-redux'
import { addTodo } from './todoSlice';

export default function AddTodo(): JSX.Element {
    const dispatch = useDispatch();
    const [text, setText] = React.useState('');

    function handleChange(e: { target: HTMLInputElement; }) {
        setText(e.target.value);
    }

    function handleSubmit(e: any) {
        e.preventDefault()

        if (!text.trim()) {
            return
        }
        dispatch(addTodo(text))

        setText('');
    }

    return (
        <form onSubmit={handleSubmit}>
            <input value={text} onChange={handleChange} />
            <button type="submit">Add Todo</button>
        </form>
    )
}
Here we start using useDispatch, which is used to fire actions, and removes the need for wrapping the component in connect().
Now update src/app/App.tsx:
import React from 'react';

import AddTodo from 'features/todoList/AddTodo';
import './App.css';

export default function App() {
  return (
    <div>
      <AddTodo />
    </div>
  );
}
Run the app, and you should see a text input field and Add Todo button:
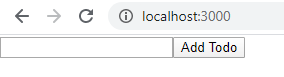
We don’t have any way of displaying todo items yet, but we have wired up our todoSlice reducer, so we should be able to add todo items, and see them in the Redux state.
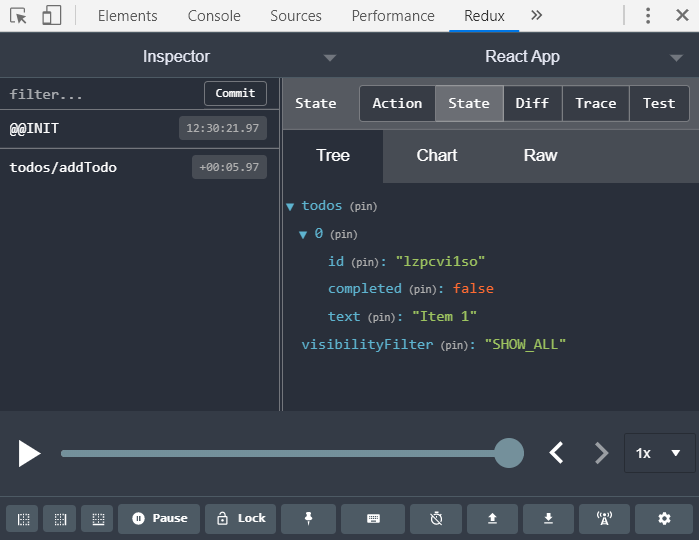
Try adding a couple of todo items by entering some text and pressing enter, or clicking Add Todo, then open up the Redux console and inspect the state by switching to the State tab. Here’s what it looks like after I added a todo item with text “Item 1”:
Displaying Todo items
Create src/features/todoList/TodoListItem.tsx:
import React from 'react'

interface TodoProps {
  completed: boolean,
  text: string
}

export default function TodoListItem({ completed, text }: TodoProps) {
  return (
    <li
      style={{
        textDecoration: completed ? 'line-through' : 'none'
      }}
    >
      {text}
    </li>
  )
}
Create src/features/todoList/TodoList.tsx
import React from 'react'
import TodoListItem from './TodoListItem'
import { RootState } from 'app/rootReducer';
import { useSelector } from 'react-redux';

export default function TodoList() {
  const todos = useSelector(
      (state: RootState) => state.todos
  );

  return (
    <ul>
      {todos.map(todo => (
        <TodoListItem key={todo.id} {...todo} />
      ))}
    </ul>
  );
}
Here, we use useSelector to fetch todos from the state, and make them available to our TodoList component. useSelector is part of Redux, and removes the need to use mapStateToProps.
The ... in {...todo} is called spread syntax:
<TodoListItem key={todo.id} {...todo} />is equivalent to:
<TodoListItem key={todo.id} id={todo.id} completed={todo.completed} text={todo.text} />Rather than specify each property one by one, it’s easier to use the spread function when you’re passing an entire object into a React component.
Now, we’ll add TodoList into App. Replace the contents of src/app/App.tsx with:
import React from 'react';
import './App.css';
import TodoList from 'features/todoList/TodoList';
import AddTodo from 'features/todoList/AddTodo';
export default function App() {
return (
<div>
<AddTodo />
<TodoList />
</div>
);
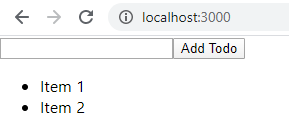
}Run the app, and try adding a couple of todo items. You should see something like:
Toggling Todo list items
Update src/features/todoList/TodoListItem.tsx to accept an onClick function, and trigger the function when the list item is clicked via <li onClick={onClick}:
import React from 'react'

interface TodoProps {
  completed: boolean,
  text: string,
  onClick: () => any,
}

export default function TodoListItem({ completed, text, onClick }: TodoProps) {
  return (
    <li
      onClick={onClick}
      style={{
        textDecoration: completed ? 'line-through' : 'none'
      }}
    >
      {text}
    </li>
  )
}
Update src/features/todoList/TodoList.tsx to get access to dispatch and add an onClick event to TodoListItem which dispatches the toggleTodo event, passing in the current todo item:
import React from 'react'
import TodoListItem from './TodoListItem'
import { RootState } from 'app/rootReducer';
import { useSelector, useDispatch } from 'react-redux';
import { toggleTodo } from './todoSlice';

export default function TodoList() {
  const dispatch = useDispatch();

  const todos = useSelector(
      (state: RootState) => state.todos
  );

  return (
    <ul>
      {todos.map(todo => (
        <TodoListItem key={todo.id} {...todo} onClick={() => dispatch(toggleTodo(todo))} />
      ))}
    </ul>
  );
}
Try adding a couple of items, then clicking on one of them. It should update the store for the item, toggling the value of completed. Here’s where I added Item 1 and Item 2, then clicked on Item 1 to mark it as completed:
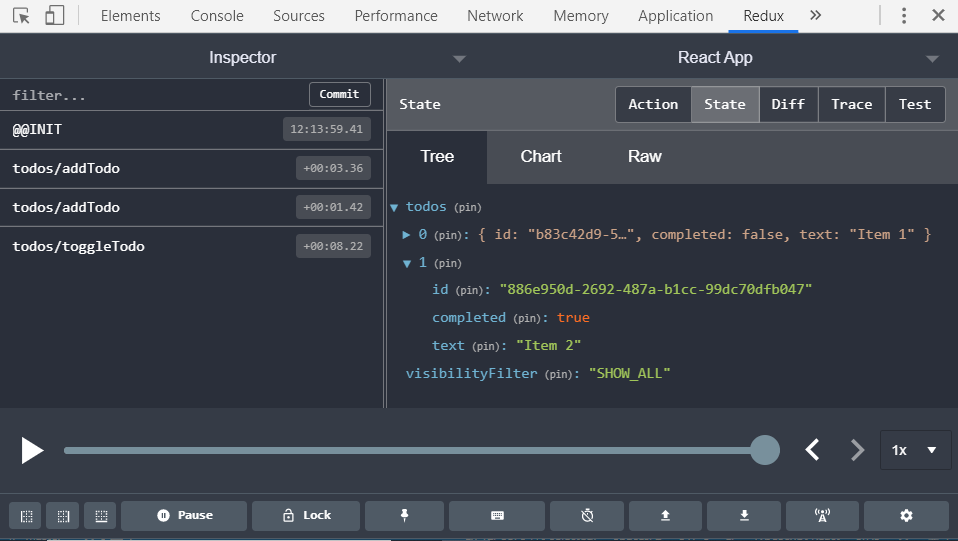
Here’s what it looks like in the Redux console. Note that there has been two todos/addTodo actions (one for each todo we added), and one todos/toggleTodo action (for the one that we toggled):
Filtering Todo list items
Add features/visibilityFilter/FilterButton.tsx:
import React from 'react'

import { setVisibilityFilter, VisibilityFilter } from 'features/visibilityFilter/visibilityFilterSlice'
import { useDispatch, useSelector } from 'react-redux';
import { RootState } from 'app/rootReducer';

interface FilterButtonProps {
  visibilityFilter: VisibilityFilter,
  text: string,
}

export default function FilterButton({ visibilityFilter, text }: FilterButtonProps): JSX.Element {
  const dispatch = useDispatch();

  const currentvisibilityFilter = useSelector(
    (state: RootState) => state.visibilityFilter
  );

  return (
    <button
      disabled={currentvisibilityFilter === visibilityFilter}
      onClick={() => dispatch(setVisibilityFilter(visibilityFilter))}>
      {text}
    </button>
  );
}
Add features/visibilityFilter/Footer.tsx
import React from 'react'
import FilterButton from './FilterButton'

import { VisibilityFilter } from 'features/visibilityFilter/visibilityFilterSlice'

export default function Footer(): JSX.Element {
  return (
    <div>
      <span>Show: </span>
      <FilterButton visibilityFilter={VisibilityFilter.ShowAll} text={"All"} />
      <FilterButton visibilityFilter={VisibilityFilter.ShowActive} text={"Active"} />
      <FilterButton visibilityFilter={VisibilityFilter.ShowCompleted} text={"Completed"} />
    </div>
  );
}
Now, add the footer to App.tsx:
import React from 'react';
import './App.css';
import TodoList from 'features/todoList/TodoList';
import AddTodo from 'features/todoList/AddTodo';
import Footer from 'features/visibilityFilter/Footer';
export default function App() {
return (
<div>
<AddTodo />
<TodoList />
<Footer />
</div>
);
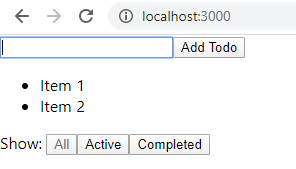
}If you run the app now, you’ll see three filter buttons:
The buttons won’t trigger any actual filtering yet, but will update the visibilityFilter state, and toggle between active/disabled.
Try clicking the buttons and seeing the visibilityFilter state changing in the Redux console.
Now, we’ll update TodoList to filter todos based on the visibilityFilter state.
Update features/todoList/TodoList.jsx:
import React from 'react'
import TodoListItem from './TodoListItem'
import { RootState } from 'app/rootReducer';
import { useSelector, useDispatch } from 'react-redux';
import { toggleTodo } from './todoSlice';
import { VisibilityFilter } from 'features/visibilityFilter/visibilityFilterSlice';
import { Todo } from './types';

const getVisibleTodos = (todos: Todo[], filter: VisibilityFilter) => {
  switch (filter) {
    case VisibilityFilter.ShowAll:
      return todos
    case VisibilityFilter.ShowCompleted:
      return todos.filter(t => t.completed)
    case VisibilityFilter.ShowActive:
      return todos.filter(t => !t.completed)
    default:
      throw new Error('Unknown filter: ' + filter)
  }
}

export default function TodoList(): JSX.Element {
  const dispatch = useDispatch();

  const todos = useSelector(
      (state: RootState) => getVisibleTodos(state.todos, state.visibilityFilter)
  );

  return (
    <ul>
      {todos.map(todo => (
        <TodoListItem key={todo.id} {...todo} onClick={() => dispatch(toggleTodo(todo))} />

      ))}
    </ul>
  );
}
Run the app, and you should be able to:
- Add todos
- Toggle between active/completed by clicking on todos
- Filter on all/active/completed by clicking the buttons below the todo list.
- Use the Redux dev tools to see actions and state changes over time.
In the code above, we:
- Use a selector to pass todos, and current visibility filter from the state into
getVisibleTodos, which… - Filters the todos for us based
visibilityFilter, and… - Returns the filtered result, which…
- Gets assigned to
const todosinTodoList, which is then… - Iterated over in
todos.map, then… - Displayed via
TodoListItem
Whew!
Saving and loading todos via an API
Next, we’ll enable persistence and sharing of todo lists via a bookmarkable URL.
I recently discovered jsonstore.io - a service that can be used to store JSON data which can be read from / written to via CORS requests. This means that you can support data storage in your Single Page Application (SPA) without having to host your own backend.
I don’t know too much about jsonstore.io, so don’t recommend it for situations where you need security, privacy, or availability guarantees, but it’s great to use for testing or quick app mockups.
We’ll use axios as our HTTP client:
npm install axiosOnce that’s installed, add src/api/jsonstore.ts:
import axios from 'axios'
import { Todo } from 'features/todoList/types';

const baseUrl = 'https://www.jsonstore.io/0325ffacd673db762850eb3152b9242526a58eb84933fdd7464dd07b4fc60124'

interface GetTodosResponse {
    result: Todo[],
    ok: boolean
}

export async function readTodos(): Promise<Todo[]> {
    const response = await axios.get<GetTodosResponse>(baseUrl + window.location.pathname, {
        headers: {
          'Access-Control-Allow-Origin': '*',
        }
    });

    return response.data.result;
}

export async function writeTodos(todos: Todo[]) {
    await axios.put<Todo[]>(baseUrl + window.location.pathname, todos, {
        headers: {
          'Access-Control-Allow-Origin': '*',
        }
    });
}
We’re using axios to fetch data of type GetTodosResponse, which contains a property data.result containing the array of todos, and write data of type Todo[].
In order to perform requests against jsonstore.io using CORS, we pass the header 'Access-Control-Allow-Origin': '*',
jsonstore.io returns data in the format:
{
  "result": json data in the same format that you wrote or null,
  "ok": boolean
}
When fetching todos via await axios.get<GetTodosResponse>(...), the response be of type GetTodosResponse, and will look something like this:
{
   "result":[
      {
         "completed":false,
         "id":"5f13c24f-aa90-42a3-993d-a9cd7a1d0de2",
         "text":"Todo 1"
      },
      {
         "completed":false,
         "id":"ed64c99f-7d66-46cd-9878-03d55ec1e86a",
         "text":"Todo 2"
      },
      {
         "completed":false,
         "id":"8b21a5f5-1ed6-43ab-9758-ae27d078f306",
         "text":"Todo 3"
      }
   ],
   "ok":true
}
Take a look here:
https://www.jsonstore.io/0325ffacd673db762850eb3152b9242526a58eb84933fdd7464dd07b4fc60124/ojqrhuv03
Next, we’ll update todoSlice to handle persistence of todo items. We’ll be using an auto-generated id for this
Update todoSlice.ts to start using the new functions in jsonstore.ts:
import { createSlice, PayloadAction } from '@reduxjs/toolkit';

import { AppThunk, AppDispatch } from 'app/store'
import { RootState } from 'app/rootReducer';
import { writeTodos, readTodos as fetchTodos } from 'api/jsonstore';
import { Todo } from 'features/todoList/types';

const initialState: Todo[] = [];

const todoSlice = createSlice({
  name: 'todos',
  initialState,
  reducers: {
    receiveTodos(state, action: PayloadAction<Todo[]>) {
      return action.payload;
    },
    receiveTodo(state, action: PayloadAction<Todo>) {
      state.push(action.payload);
    },
    toggleTodo(state, action: PayloadAction<Todo>) {
      let todo = state.find(todo => todo.id === action.payload.id);

      if (todo) {
        todo.completed = !todo.completed;
      }
    },
  }
});

export const { toggleTodo } = todoSlice.actions;

export const createTodoList = (): AppThunk => async (dispatch: AppDispatch) => {
  const id = Math.random().toString(36).substr(2, 9);
  window.history.pushState(null, document.title, `${id}`);
}

export const loadTodos = (): AppThunk => async (dispatch: AppDispatch) => {
  const todos = await fetchTodos();
  dispatch(todoSlice.actions.receiveTodos(todos))
}

export const addTodo = (
  text: string
): AppThunk => async (dispatch: AppDispatch, getState: () => RootState) => {
  const newTodo: Todo = {
    id: Math.random().toString(36).substr(2, 9),
    completed: false,
    text: text,
  }

  dispatch(todoSlice.actions.receiveTodo(newTodo));

  writeTodos(getState().todos);
}

export default todoSlice.reducer;
Update App.tsx to update a todo list if there’s a todo list id specified on the path, or otherwise, create a new todo list, adding the new todo list id to the path:
import React from 'react';
import './App.css';
import TodoList from 'features/todoList/TodoList';
import AddTodo from 'features/todoList/AddTodo';
import Footer from 'features/visibilityFilter/Footer';
import { useDispatch } from 'react-redux';
import { loadTodos, createTodoList } from 'features/todoList/todoSlice';
export default function App() {
const dispatch = useDispatch();
React.useEffect(() => {
if (window.location.pathname === '/'){
dispatch(createTodoList());
} else {
dispatch(loadTodos());
}
}, [dispatch]);
return (
<div>
<AddTodo />
<TodoList />
<Footer />
</div>
);
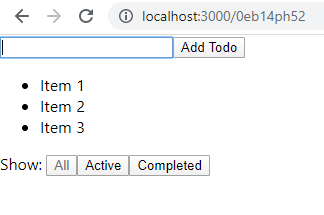
}Start the app, and you should see an id on the URL - this is the generated ID for this particular todo list.
Add some items to the todo list, and copy+paste that URL to another browser window / incognito browser, and you’ll see that your todo items.
And we’re done.
What’s next?
We don’t have any type safety when decoding JSON data; typescript types are only compile-time types, and once compiled, it’s just regular JS. If you want to ensure type safety when interacting with the jsonstore.io API, consider using something like ts-json-decode.
If you’d like to continue building this app, productionising it by adding authentication and a secure backend, consider Firebase or AWS AppSync
For more complex data flows, check out Redux Saga and Redux Observable
Thanks for reading!
Enjoyed this article? Follow me on Twitter
Any questions, feedback, or anything that you think I’d be interested in? Please leave a comment below, or get in touch with me directly.
Want to read more?